

It’s the time of year for parties and potlucks and gatherings, which, of course, means that cheese boards abound.
I flock to cheese boards whenever they are available. It is my firmly held belief that all occasions are appropriate for a cheese board.
I love that they are easy to prepare ahead of time, people get to pick what from them they want to eat (I think this is an underrated benefit of the cheese board - you don’t have to worry about preparing a dish or appetizer that accommodates specific dietary restrictions or preferences. There are options for vegans/vegetarians/gluten free/etc.), and there’s nothing that really needs to be made - it’s just a matter of assembling all of the elements.
They look so elegant, but could not be simpler to put together.
Whether for an appetizer, a late night snack, or a meal in itself (my personal favorite), if you find yourself making a cheese plate this season, here is a guide for cheese plate success!
The tools:
A Board: First things first, you need a surface. You likely already have something you can use, and it doesn’t have to be fancy - think a tray, a platter, a cookie sheet, a large cutting board. I aim to have something that is easily portable, and I don’t worry about the surface itself - my goal is to completely cover it.

Marble Slab | Slate Board | Extra Large Cutting Board | Wooden Board (similar)
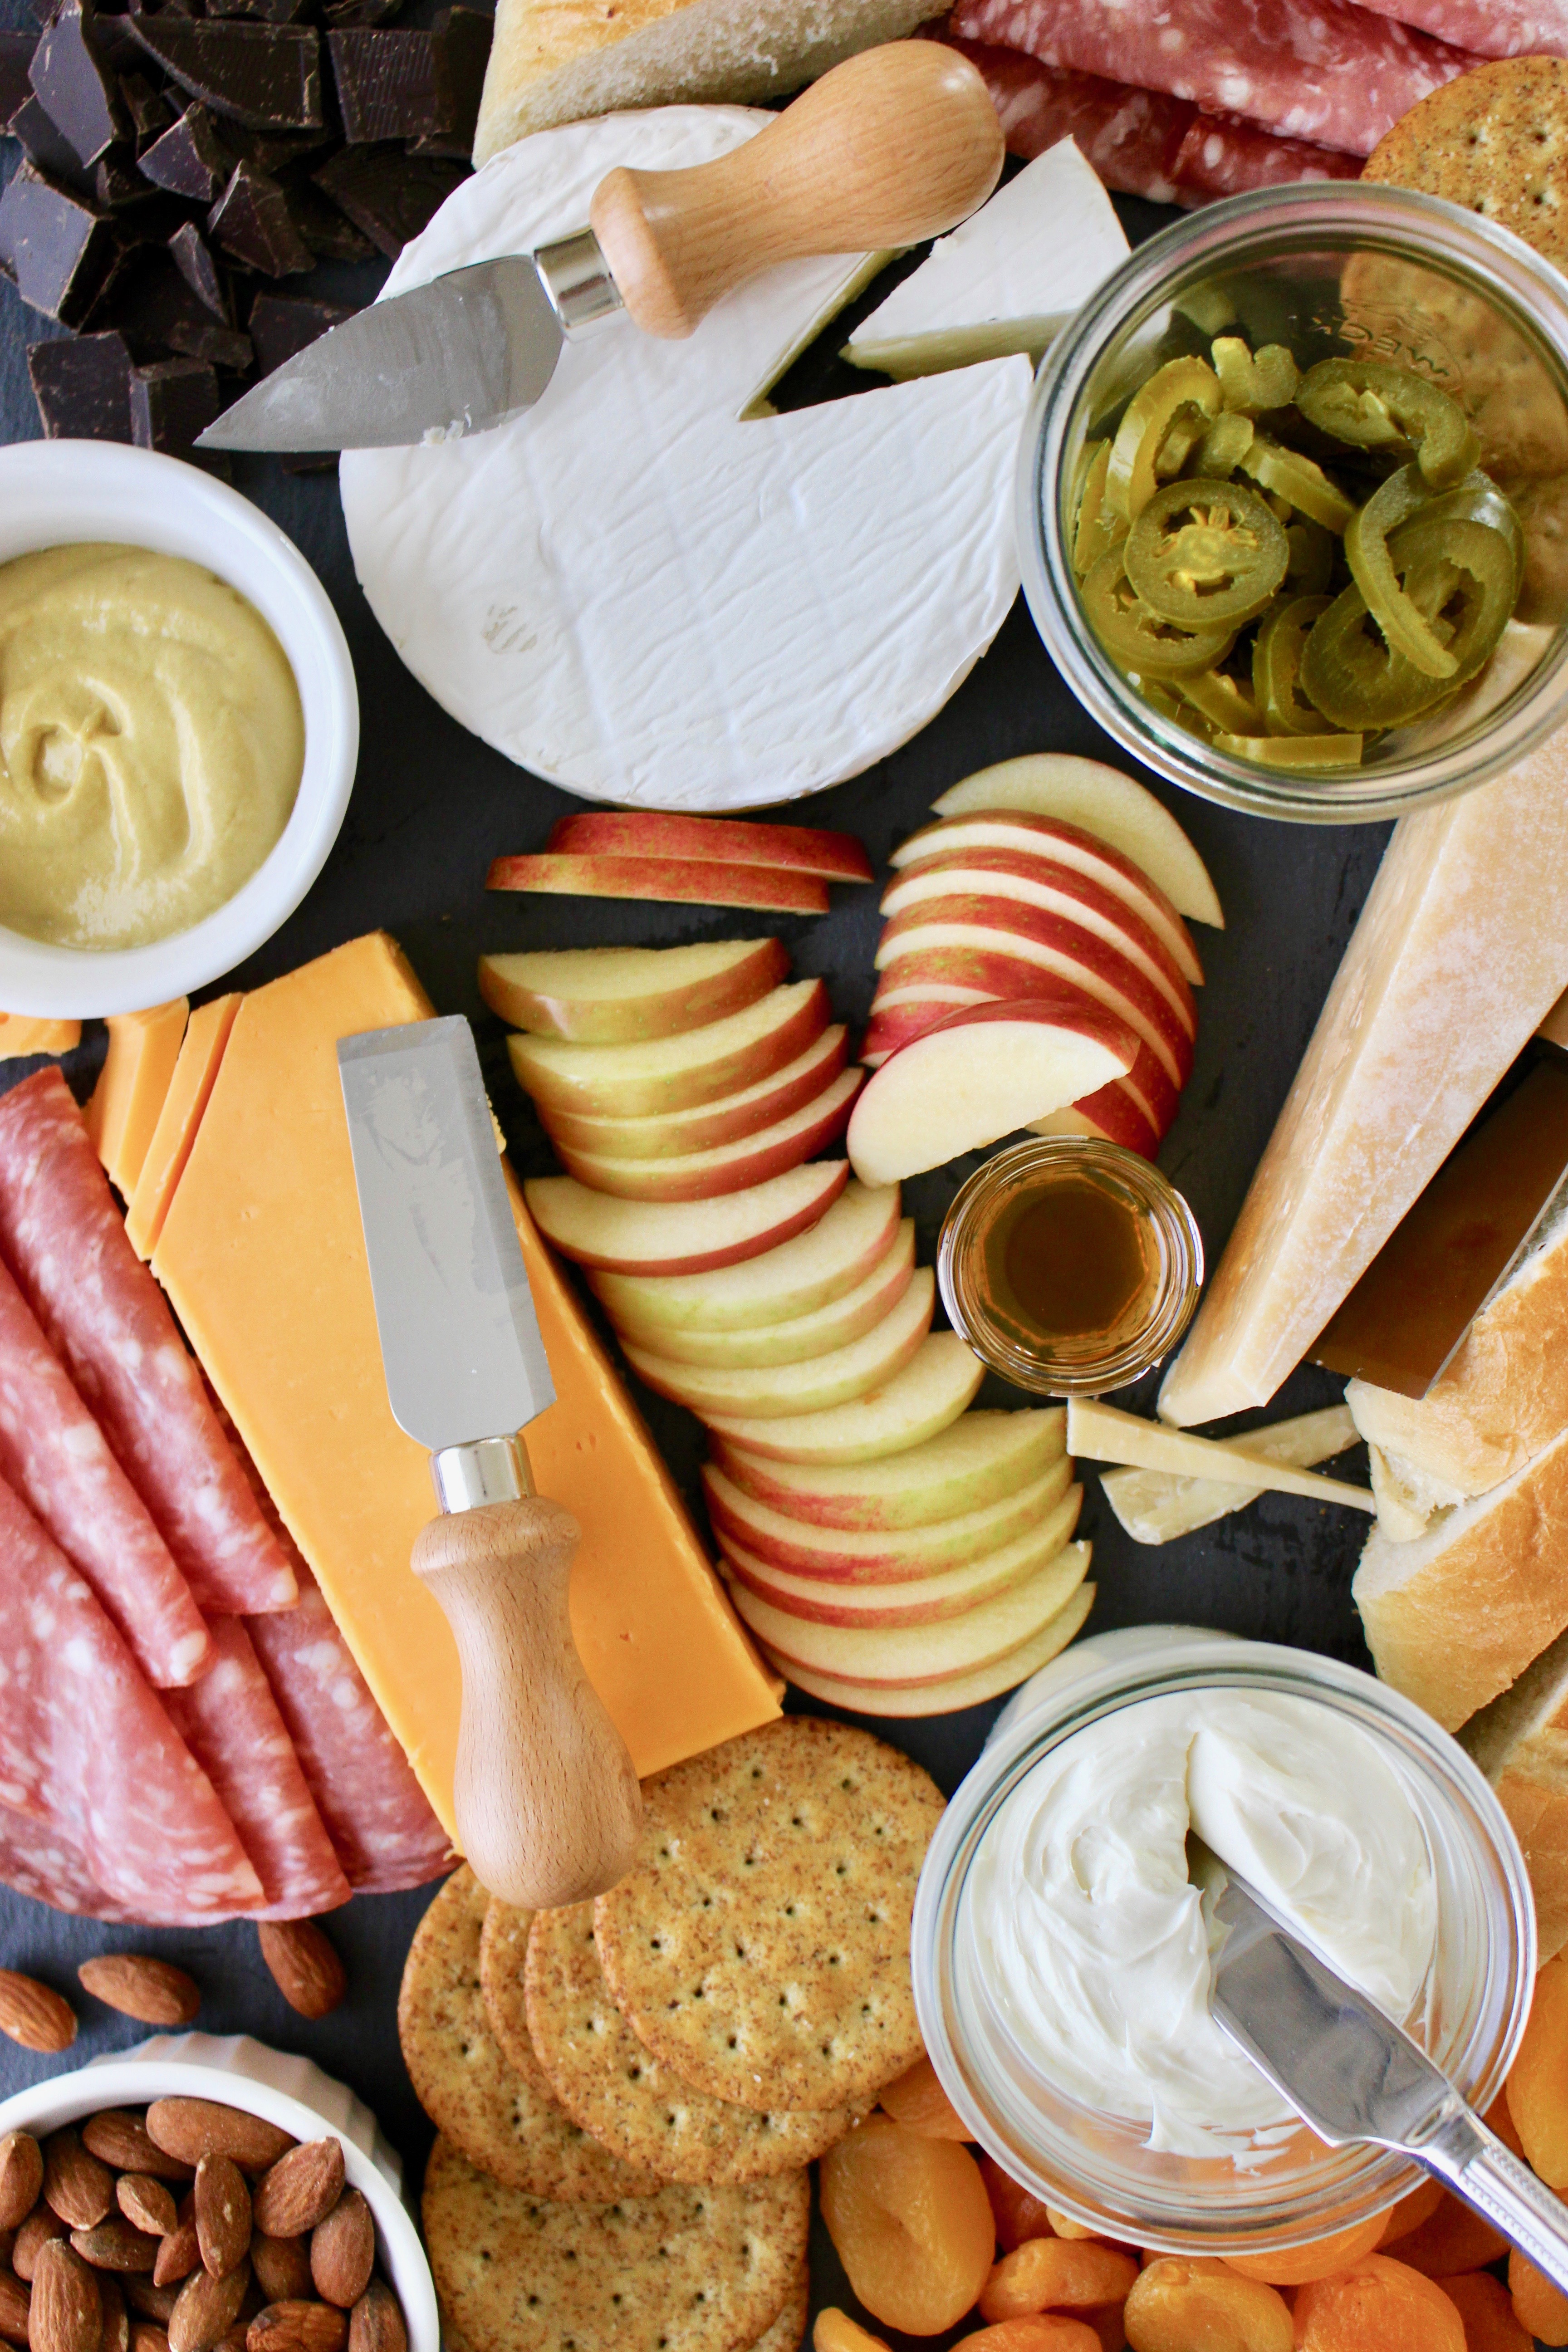
Cheese Knives: Next, you will want a set of cheese knives. If ever you have been stuck in a situation where you are given a dull butter knife to cut a hard, aged cheese, you know the importance of having an actual cheese knife. It is a beautiful thing to be able to easily slice through aged gouda without flinging a block of cheese across the room. (And it also facilitates the speed at which I prefer to eat aged gouda).
Ramekins: All you really need for a successful cheese board is cheese and something to serve it with and on. It doesn’t need to be more complicated than that. But, if you plan on adding spreads/nuts/pickles/fruit/etc., it’s nice to have little containers to put them in. I find ceramic ramekins and little jars do the trick.
Cheese Labels: Totally optional in my mind are cheese labels. I find people can generally tell what type of cheese is what, but I also think it’s a fun conversation starter to talk about what kind of cheese is this? If you prefer labels, I’m a fan of the reusable ones you can write on (like these!). That way you’re not bound to always get the brie/cheddar/bleu that typically come on pre-labeled cheese labels.
The Food:
The Essentials:
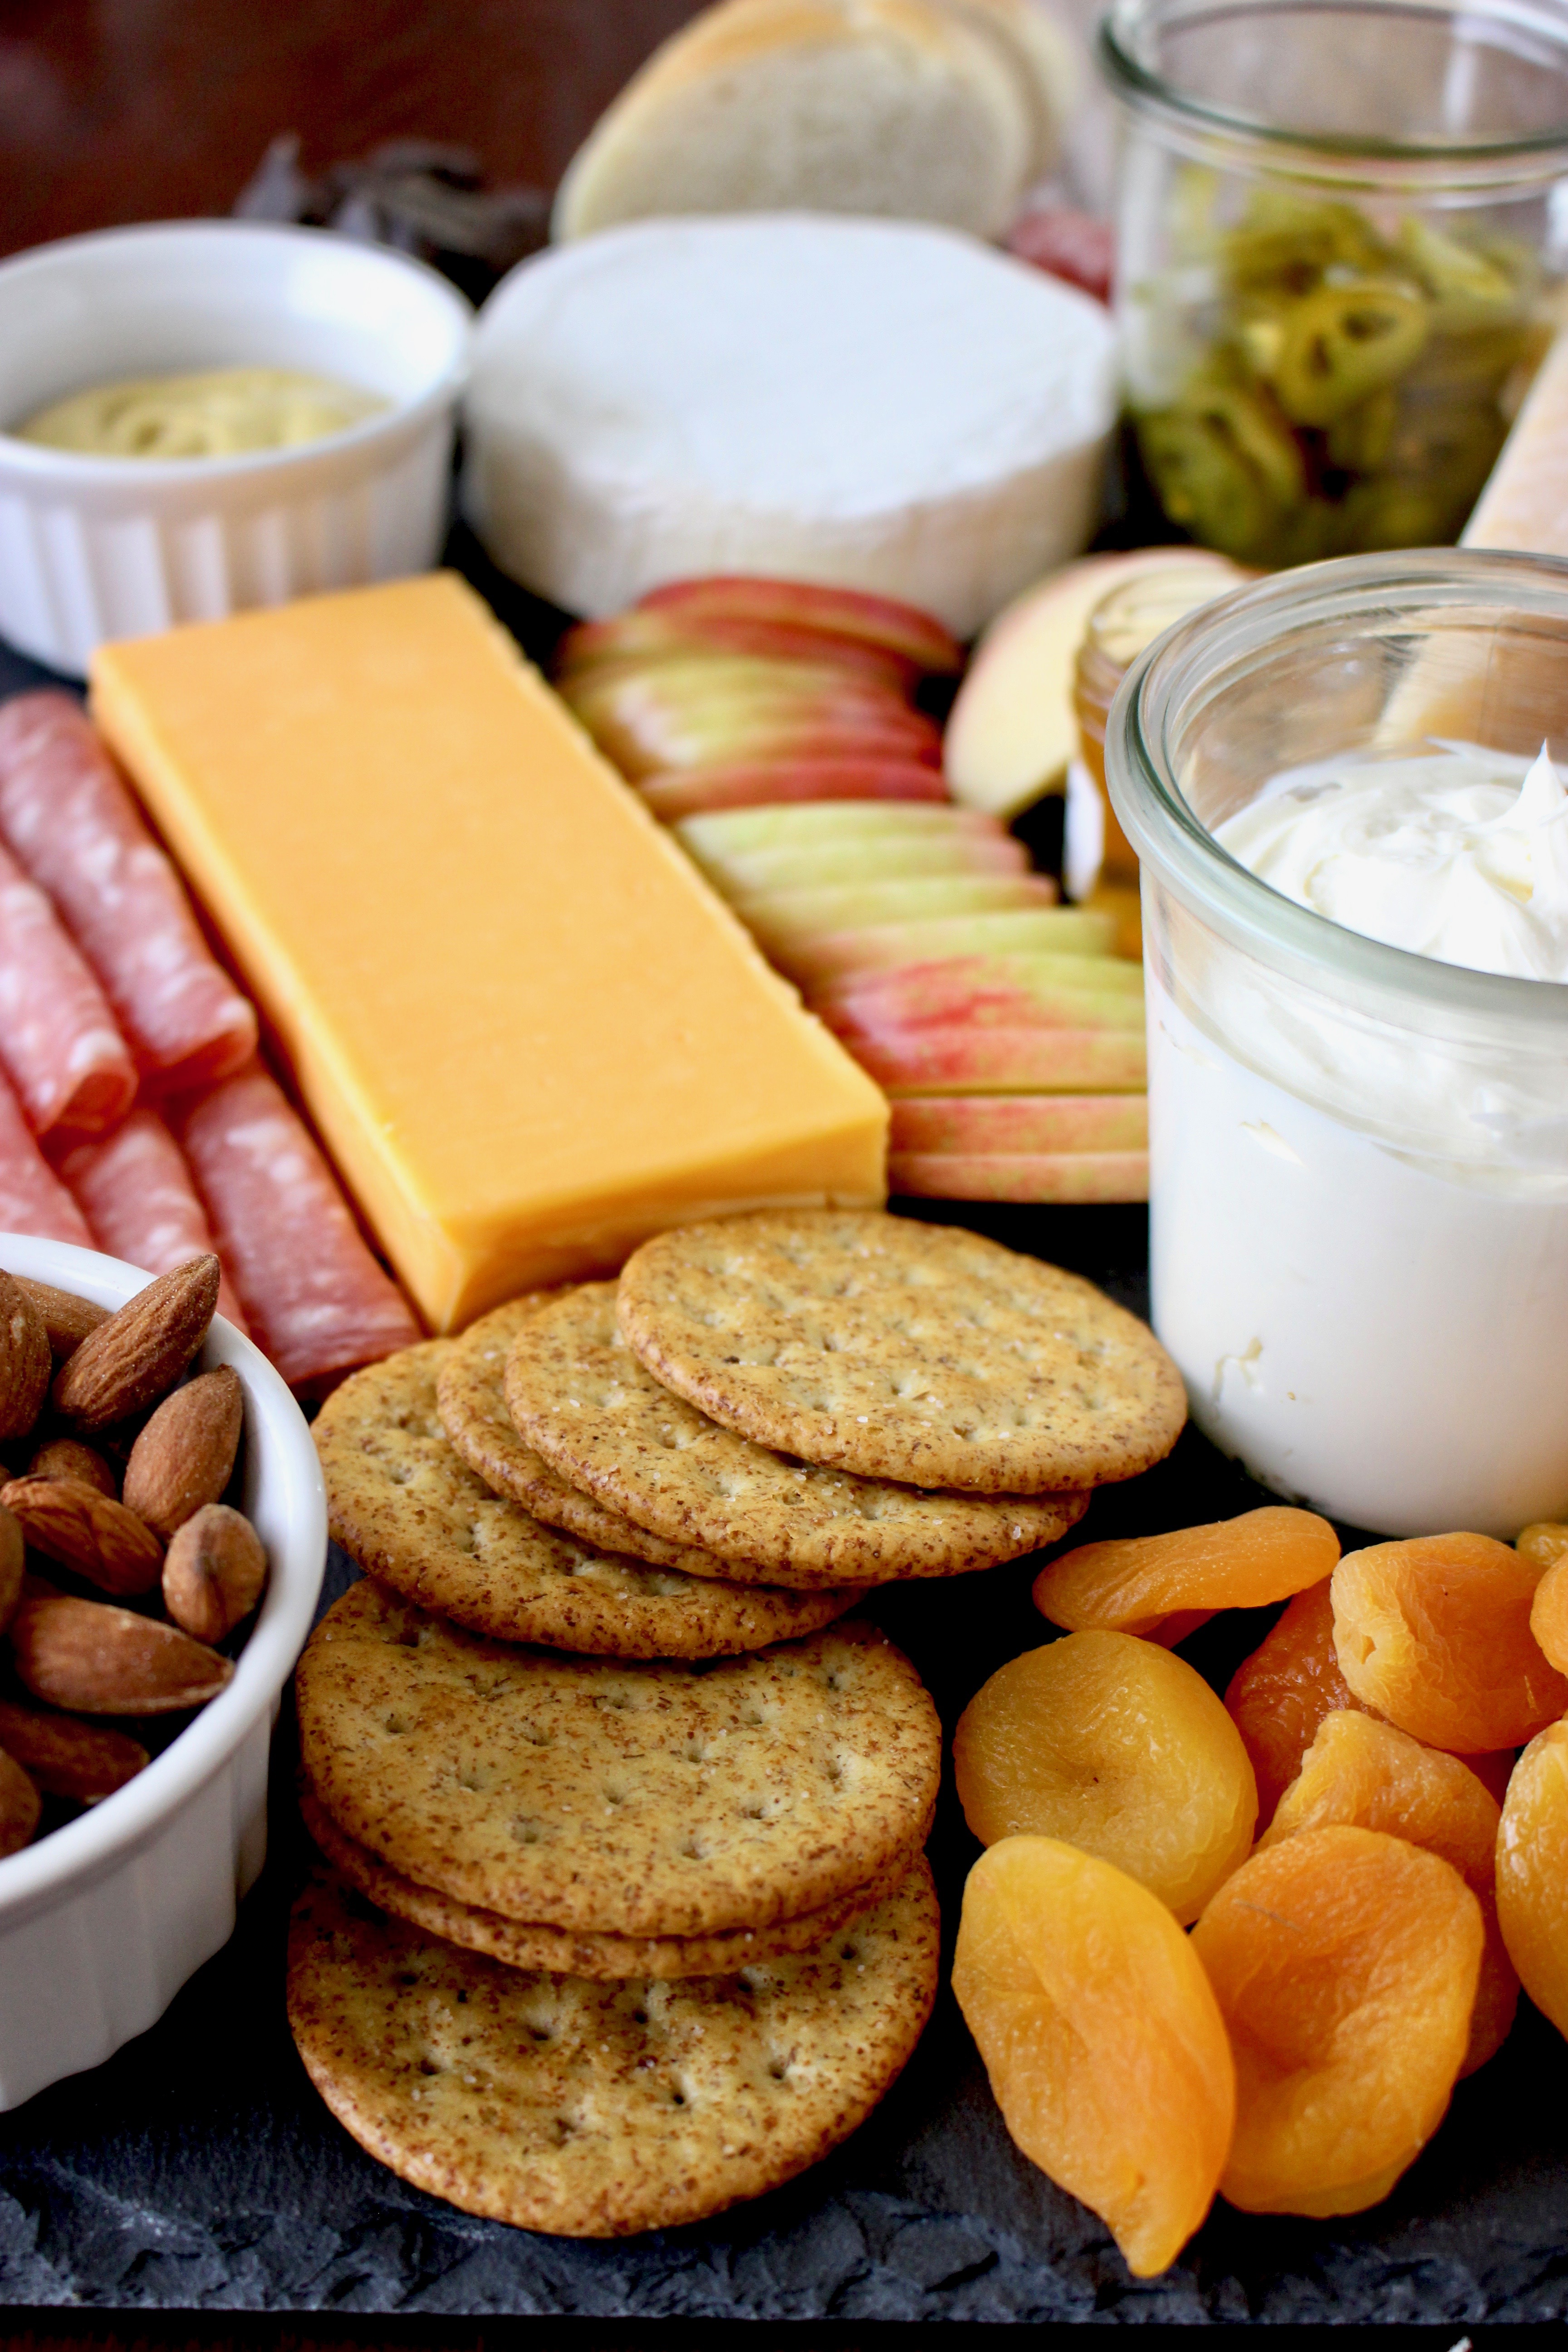
Cheese: Of course, you’re going to need cheese. You will want 3-5 different types of cheese. The rule of thumb is to have 3-4 ounces of cheese per cheese-eater. They should be served at room temperature. Aim to get some hard and some soft cheeses. It's nice to get a variety of shapes and colors, too. I like to get a couple crowd pleasers like Boursin (or make this Homemade Boursin) and brie, and some for stinky cheese lovers.
- Fresh - mozarella, cream cheese, ricotta
- Soft - brie, camembert, feta, goat, fresh mozarella
- Semi-soft - fontina, havarti
- Semi-hard - asiago, cheddar, gouda, gruyere
- Hard - parm, pecorino romano
- Bleu - roquefort, gorgonzola
Vessels for cheese: The backbone of a cheese board. Variety is good here! Pretzels, sliced baguette, crackers, etc.
These are the only things you really need for a successful cheese board. If you want to kick your board up a notch, or if your cheese board is intended to be a meal in itself, add a variety of things from the following categories:
The Extras:
Salty: Cured meats, nuts, olives, pickles.
Sweet: Sliced apples, pears, grapes, figs, berries, dried fruit, chopped chocolate.
Spreads: Pesto, mustard, jam, preservatives, honey.
Once you have all of the elements of your cheese board selected, all that’s left to do is assemble. This can easily be done in advance.
How to Assemble a Cheese Board
1. Select your board. Again, this doesn't have to be anything fancy. In my opinion, the best kind of cheese board is so jam-packed with food that you can't see the surface it's on anyway.
2. Arrange the cheese with their respective knives. Cheese should be easily accessible from all angles - spread out accordingly. Cheeses and knives should face different directions so there is no “front” of the board.
I like to slice a couple of pieces of each cheese because I find it gives the board more of a let’s eat a lot of cheese! feel and not a don’t touch this immaculate display feel.

3. Add the vessels for cheese. Your crackers/bread/pretzles. You want these to be evenly dispersed throughout the board so they are easily accessible from all angles.
4. Fill in gaps with any “extras” you might be using. Salty and sweet things can be put straight on the board, or use ramekins and other small containers to separate them. I like to do a combination of both. Any spreads I’m using usually stay in their original containers if they're small enough, or go in ramekins as well.
5. Add any labels (optional). I don't do this. I like my cheese board to have a little mystery, you know? But! I won't argue that cheese labels aren't cute and utilitarian.
6. Make sure anything that needs a serving utensil has one. Your goal is for everything to be super easy to eat. No one wants to be prevented from drizzling honey all over their goat cheese because there's nothing for them to drizzle with.
That’s all there is to it! I find the most challenging part of a cheese board is the shopping trip it usually requires. SO, I made a list of all of the elements of a successful cheese board covered in this post that can be printed off to take to the store with you. Grab it below, and get shopping!
Click here for the printable: Cheese Board Shopping List

Happy cheese board season, and happy cheese-eating!
Leave a Reply